
Introduction
Taking screenshots is one of the most essential computer skills that can help you save, share, or document anything on your screen. Whether you want to capture a full webpage, a portion of your desktop, or an error message, knowing how to screenshot on an HP laptop or desktop is incredibly useful. HP computers run on Windows, so you have several built-in tools and shortcuts available that make this process fast and simple. In this guide, we’ll walk you through every practical method to take screenshots on HP devices, from keyboard shortcuts to advanced tools, so you can capture anything with confidence.
Understanding How Screenshots Work on HP Devices
A screenshot is simply an image of whatever is currently displayed on your screen. HP laptops and desktops offer multiple ways to take screenshots depending on what you need. You can capture your full screen, a single window, or a custom area. The best method often depends on the task—quick captures use keyboard shortcuts, while detailed edits might require tools like Snipping Tool or Snip & Sketch.
The Simplest Method: Print Screen (PrtScn) Key
The most basic method to screenshot on any HP device is by using the Print Screen (PrtScn) key. This key is usually located at the top of your keyboard and may appear as “PrtSc” or “PrtScn.”
Using PrtScn Alone
Pressing the PrtScn key captures your entire screen and saves it to your clipboard. You can then paste the screenshot into an app like Paint, Microsoft Word, or an email by pressing Ctrl + V.
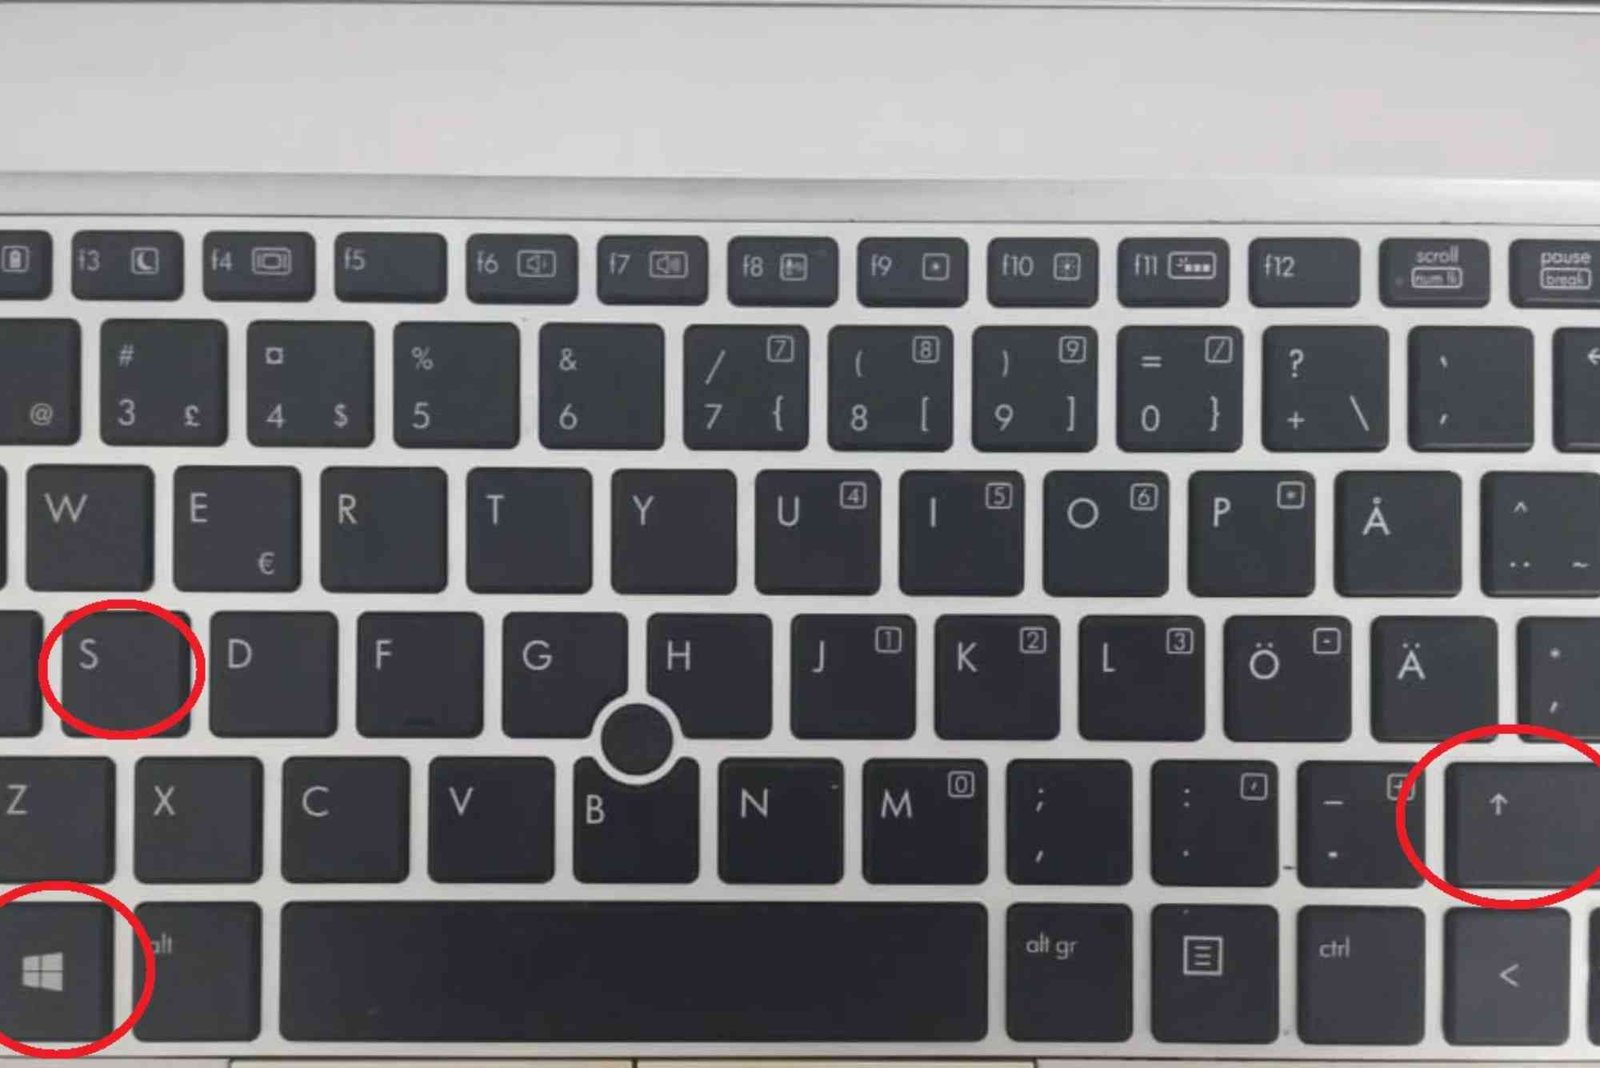
Using PrtScn with Windows Key
If you want to automatically save your screenshot as an image file, press Windows + PrtScn. The screen may dim for a second, indicating that the capture was successful. Your screenshot will be saved in the “Screenshots” folder inside “Pictures.”
Using Alt + PrtScn for Window Capture
When you only want to capture the currently active window, press Alt + PrtScn. This saves just that window to your clipboard, which you can paste into another app.
Using the Snipping Tool
HP computers come with a built-in feature called Snipping Tool, which provides more control over screenshots. It allows you to capture specific parts of your screen with ease.
How to Use Snipping Tool
Search “Snipping Tool” in the Windows Start menu and open it.
Click on “New” to begin your screenshot.
Select the area you want to capture.
Once captured, you can annotate, edit, or save the image.
The Snipping Tool is ideal when you need precision. It also allows you to take delayed screenshots, which can be helpful when capturing drop-down menus or tooltips.
Using Snip & Sketch
Windows 10 and 11 include Snip & Sketch, an upgraded version of the Snipping Tool. It integrates new editing tools and makes sharing screenshots easier.
How to Use Snip & Sketch
Press Windows + Shift + S to open the Snip & Sketch overlay.
Your screen will dim, and you can select the area to capture.
Once done, a notification will appear—click it to open the screenshot in Snip & Sketch.
Edit, annotate, and save the image as needed.
Snip & Sketch is excellent for users who want more editing flexibility without installing additional apps.
Taking Screenshots with HP Chromebook
If you’re using an HP Chromebook instead of a Windows laptop, the process differs slightly.
Full-Screen Screenshot on Chromebook
Press Ctrl + Show Windows (the rectangle with two vertical lines) to take a full-screen screenshot.
Partial Screenshot on Chromebook
Press Ctrl + Shift + Show Windows, then drag the crosshair to select the area you want to capture.
These screenshots are automatically saved in your “Downloads” folder and can be accessed instantly.
Using Windows Game Bar
The Xbox Game Bar is another handy built-in feature that lets you take screenshots while gaming or working.
How to Use Game Bar
Press Windows + G to open the Game Bar.
Click the camera icon, or press Windows + Alt + PrtScn to capture your screen.
Your screenshot will automatically save to the “Videos > Captures” folder.
This is an excellent option for gamers or anyone wanting quick captures without leaving their work.
Taking Screenshots on HP Touchscreen Devices
For touchscreen HP laptops or tablets, taking a screenshot is even easier. Simply press Power + Volume Down simultaneously, just like How toScreenshot on An HP on a smartphone. The screen will flash briefly, and your screenshot will be saved automatically in the “Pictures > Screenshots” folder.
Using Third-Party Screenshot Tools
If you take screenshots frequently and need advanced editing, third-party apps like Lightshot, Greenshot, and Snagit can enhance your workflow. These apps offer features like instant uploading, annotation, and cloud storage integration.
Popular Tools Worth Trying
-
Lightshot: Lightweight and quick for sharing screenshots online.
-
Greenshot: Open-source and perfect for professionals needing annotations.
-
Snagit: Offers video recording, scrolling capture, and advanced editing tools.
Using these tools can save you time and provide more professional results, especially for presentations, blogs, or tutorials.
Common Screenshot Problems and Fixes
Sometimes, your screenshot shortcut might not work due to system settings or keyboard conflicts.
Fixing Screenshot Issues
-
Check Keyboard Settings: Ensure the function (Fn) key isn’t required for PrtScn.
-
Storage Issues: If screenshots aren’t saving, check your “Pictures” folder or storage space.
-
Update Drivers: Outdated keyboard or display drivers can interfere with shortcuts.
If you still face issues, you can try resetting your keyboard settings or using an alternative method like Snip & Sketch.
Expert Tips for Better Screenshots
To make your screenshots look professional, follow these simple tips:
-
Always ensure your screen is clean and uncluttered.
-
Use Alt + PrtScn for precise window captures.
-
Edit your screenshots to highlight important areas using arrows or text.
-
Use PNG format for clear images, and JPG for smaller file sizes.
-
Consider using Lightshot for quick editing and sharing options.
If you’re working on tutorials, product reviews, or blogs, enhancing your screenshots can significantly improve your content quality.
Why Knowing How To Screenshot Matters
Learning how to screenshot on an HP might seem small, but it’s an essential digital skill. From sharing technical issues with support teams to saving online receipts or capturing creative inspiration, screenshots simplify your everyday tasks. Whether you use them for school, business, or personal use, mastering this tool can make your workflow smoother and more efficient.
Knowing how to screenshot on an HP laptop or desktop opens up many possibilities for productivity and creativity. Whether you use the Print Screen key, Snip & Sketch, or advanced tools like Snagit, the ability to capture what’s on your screen is a skill worth mastering. With practice, you’ll quickly find the method that works best for you.
If you want to explore more practical computer tutorials and guides, visit the official HP resources or detailed tutorials available online. For a complete step-by-step guide, check out How To Screenshot or learn additional techniques through How To Screenshot On. To discover advanced tech insights, Read more on www.howtogeek.com.
FAQs
How do I take a screenshot on my HP laptop without the Print Screen key?
You can use Windows + Shift + S to open Snip & Sketch or use the Snipping Tool for full control.
Where do my screenshots go on HP?
Screenshots taken with Windows + PrtScn are saved in the “Pictures > Screenshots” folder. Screenshots captured with Snip & Sketch allow you to choose where to save them.
Can I take screenshots on an HP desktop PC?
Yes. The same shortcuts apply—PrtScn, Alt + PrtScn, or Windows + PrtScn—depending on your needs.
How do I take a scrolling screenshot on HP?
Windows does not natively support scrolling screenshots, but tools like Snagit or browser extensions can help you capture long pages.
Can I use third-party apps for screenshots on HP?
Yes, tools like Lightshot and Greenshot provide extra features like editing, annotation, and direct uploads.